Installing a new light fixture can transform a room and enhance its overall appearance. However, the task can seem challenging, particularly if there is no pre-existing wiring in the desired location.
There are 5 steps that you should follow to install the light fixture without wiring. These are: gathering the tools, placing the fixture, installing the cable, connecting the wires, and hanging the fixture.
With clear instructions and helpful tips, the guide aims to give readers the necessary confidence to complete the project.

How to Install a Ceiling Light Fixture without Existing Wiring?
There are a few steps to go through to figuring out how to install a ceiling light without existing wiring. They are:
Before you begin the installation process, you’ll need to acquire a few tools to ensure that the job is done correctly and that you’re safe. You must always wear proper safety gear before working with any electrical components.
Which equipment do I need?
- First of all, you need to acquire rubber boots and gloves.
- You might need goggles to protect your eyes in case of sparks or feedback.
- Use an electric voltage tester to check the voltage of the wires, if they are accurately supplying the preferred voltage as well as checking if the power has been turned off properly.
- You can either use contact voltmeters or non-contact voltage testers which provide ample safety.
2. Placing the Fixture and the Light Switch
It is crucial to properly select the location for the fixture, the switch and the path for the cable. Because to properly wire the fixture, you must create a proper power line.
How to place the fixture and the light switch?
- Choose a location that meets your requirements. Place the fixture near the center of the ceiling if it is intended to provide light to the entire room. Remove plastic ceiling light cover if needed.
- Place the fixture in a specific area, such as over a table or kitchen island, to provide more light to that area.
- With a stud finder, locate the ceiling joists in that area, as the electrical box from which the fixture hangs will attach to the side of the joist.
- Trace the outline of a ceiling electrical box against the ceiling where the fixture will be installed.
- Using a drywall saw, make a hole in the ceiling.
- Place an old-fashioned electrical box against the wall, between two studs, where the light switch will be installed.
- Trace the box onto the wall and use the drywall saw to cut a hole.
3. Installing the Cable
In order for the fixture to work properly, you have to complete the wire installation accurately. Wiring is a crucial step. Any mistakes in this step should be avoided.

How to install wiring in a room?
- Cut a small hole in the edge of the ceiling along an imaginary line that runs between the ceiling hole and the wall hole (Fig-1). The hole should be large enough for your hand to fit through.
- In the hole in the wall, insert the end of an electrician’s fish tape. Bring the fish tape all the way up to the hole you made in the ceiling.
- While you continue to feed the line, have an assistant direct the fish tape toward the hole in the ceiling.
- Connect an electrical cable to the end of the fish tape and reel it through the ceiling and wall to the light switch hole, then disconnect the fish tape.
- Place the ceiling box inside the ceiling and nail or screw it to the side of the ceiling joist, then slide the end of the cable through the knockout hole on the ceiling box.
However, the procedure might be different depending on the type of walls your room has.
4. Connecting the Wires
It’s critical to properly connect the wires for the light fixtures to work.
How to connect the wires of the fixture?
- With a pair of wire strippers, remove 2 inches of the cable sheathing where it extends from the ceiling.
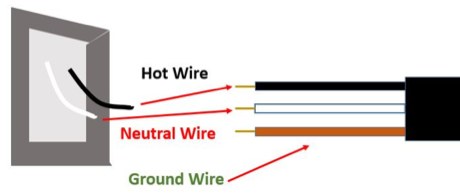
- A black (hot) wire, a white (neutral) wire, and a bare copper (ground) wire are all found inside the cable.
- With the wire strippers, remove an inch of insulation from the black and white wires.
- With a pair of pliers, twist the tip of the black wire from the cable to the tip of the black wire from the light fixture together (Fig-2).
- Wrap a wire nut around the wires’ ends and twist it several times. While keeping the wires connected, the wire nut acts as an insulator.
Take a look at “what to do with unused live electric wires” if you find any live wires.
5. Hanging the Fixture
The final step is to properly hang or attach the fixture of the light to the ceiling.
How to hang the light fixture?
- Raise the light fixture all the way to the ceiling. If the fixture is suspended from a chain, remove links until the fixture is suspended at the desired height.
- Use the mounting hardware provided by the manufacturer to secure the fixture to the ceiling box.
- Raise the canopy to the ceiling and screw it in place to cover the hole in the ceiling.
- To connect the light switch and wire the circuit to your home’s main electrical box, you may hire an electrician. Because it’s extremely dangerous, most municipalities prohibit anyone who isn’t a licensed electrician from doing so.
However, you might be wondering, how much does it cost to install a ceiling light without existing wiring? Well, it depends on the type of fixture you choose, and the amount of cable needed. But it is estimated to cost somewhere around 40$ to 50$ on average. You could also connect multiple led lights to one switch if you wish to.
How to Troubleshoot the Common Issues While Installing a Ceiling Light Fixture without Existing Wiring?
Here are some tips for troubleshooting common issues while installing a ceiling light fixture without existing wiring:
Wiring not connected properly:
Check the connections to make sure they are tight and secure. Ensure that the hot, neutral and ground wires are connected to the correct terminals on the fixture and switch.
Switch not working:
Confirm that the switch is connected properly and that the wires are not crossed. If the switch still doesn’t work, you may need to replace it.
Light fixture not turning on:
Check the wiring connections again, especially the hot wire to the fixture. Make sure the light bulb is properly installed and not burnt out.
Flickering or dim lighting:
This can be caused by loose wiring connections or a bad light bulb. Make sure all the wiring is connected securely and replace the light bulb if necessary.
Loose connections:
:If you notice any loose connections, tighten them immediately to ensure safe and proper operation of the light fixture.
Conclusion
This guide provides a comprehensive approach to help individuals successfully install a light fixture from beginning to end. Be sure to follow the steps above to properly install the ceiling light fixture.
Fortunately, by acquiring some basic knowledge and having the appropriate tools, it is possible to install a light fixture without the existence of wiring.


![How To Remove Plastic Ceiling Light Cover? [3 Methods]](https://wiringsolver.com/wp-content/uploads/2021/09/How-To-Remove-Plastic-Ceiling-Light-Cover.webp)