Changing a light bulb in a Harbor Breeze Ceiling Fan can be a tricky task for anyone who is not familiar with this type of fan. But with the right information and instructions, anyone can easily do this task.
There are several steps to get your ceiling fan lights replaced. Such as ensuring the bulb is damaged, turning off the electricity, removing the light cover, removing and adding bulbs, and finally testing the ceiling fan.
This article provides a step-by-step guide to help you replace the light bulb in your Harbor Breeze Ceiling Fan with ease. Read on to learn how to change the light of your ceiling fan.
Change Harbor Breeze Ceiling Fan Light Bulbs: Step-by-Step
Here are the steps that you will need to follow if you want to successfully remove and attach the light bulbs on your Harbor Breeze ceiling fan:
Step 1: Make Sure Your Light Has Burned Out
Most Harbor Breeze ceiling fan models come with a remote controller and a dim setting that makes the light seem burned out.
Test your remote and turn on the light’s brightness. If your fan doesn’t light up, then follow the next steps.
Step 2: Turn off the electric connection to the Fan
First, make sure that the fan is not connected to the electricity when you start the process of removing the bulbs.
Step 3: Take Your Fan Off the Ceiling or Get a Step Ladder
If you can already reach the lid or the globe that is protecting the light bulbs, then you can proceed to the nest. It’s better to have safer footing, and step ladders are the best in these situations.
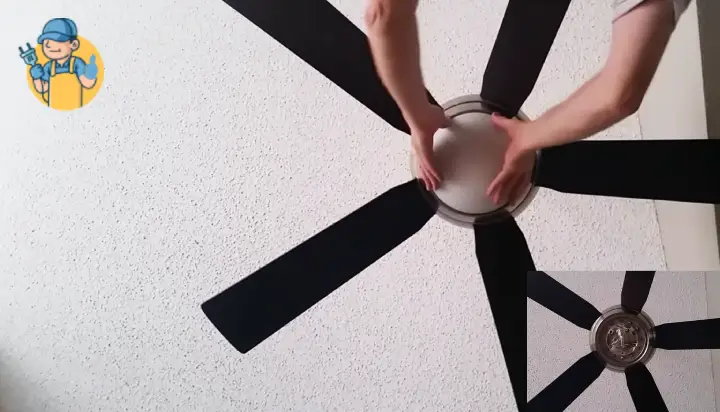
Step 4: Removing the Light Cover on the Fan
Grab the light cover with both of your hands and then place your thumbs on the middle of the cover and twist it to the left side or anti or reverse clockwise.
Step 5: Removing the Light Bulbs
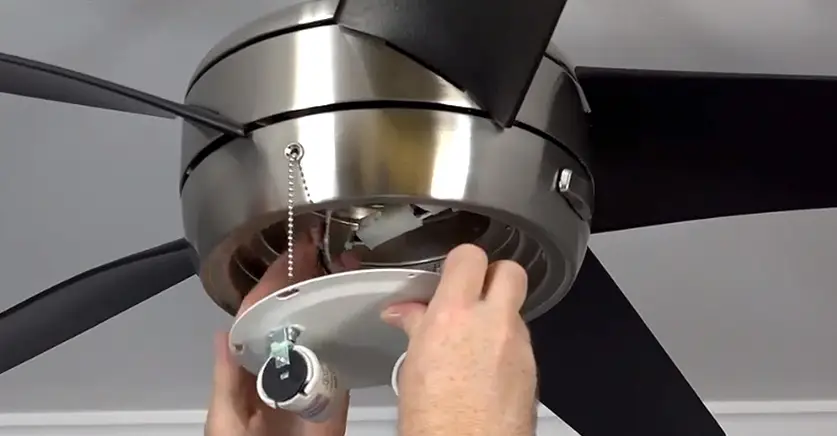
This can be done by just rotating them anticlockwise or pulling them off by using a minimal amount of strength. Look at your fan manual to make sure which process to use.
Step 6: Adding the Light Bulb
Grab a cloth or towel and attach the light bulb to the holder located in the middle of the fan. You will just need to screw it clockwise or on the right side.
Step 7: Reattaching the Light Cover
Align the light cover with your fan, and then push the cover-up and twist towards the right side. You should hear a ‘click’ sound notifying you that you have successfully installed the cover.
Step 8: Testing the Fan
Once you have installed the light cover and the light, connect the electricity to the fan and turn on the switch. If the lights get a connected move, then your work is done. But if not, then you might have misplaced the light.
If there is any circuit malfunction issue on the fan, then it can also short-circuit the bulbs when connected. If you come across this problem on your Harbor Breeze, then getting professional help is the safest bet.
Safety Precautions when Changing a Light Bulb
Changing a light bulb in a Harbor Breeze ceiling fan may seem like a simple task, but it is important to take certain safety precautions to prevent accidents and injuries.
Here are some important safety tips to follow when changing a light bulb in your Harbor Breeze ceiling fan:
Use a Sturdy Ladder:
When changing a light bulb in a Harbor Breeze ceiling fan, it is important to use a sturdy ladder that is tall enough to reach the fixture. Avoid standing on chairs or unstable surfaces as this can be dangerous.
Wear Gloves:
If you are changing a burnt-out bulb, it is advisable to wear gloves to protect your hands from cuts and burns from the hot glass.
Removing the Old Bulb:
When removing the old bulb, handle it carefully to avoid dropping it and breaking it. If the bulb is hot, wait for it to cool down before attempting to remove it. Removing LED flush mount ceiling fan lights is easy.
Use the Correct Size Bulb:
Make sure you are using the correct size bulb as specified in your Harbor Breeze ceiling fan manual. Using a bulb of the wrong size can be dangerous and may damage the light kit.
Handle the New Bulb with Care:
When installing the new bulb, handle it gently to avoid breaking it. Do not touch the glass part of the bulb with your bare hands as the oil from your skin can cause the bulb to burn out prematurely.
Check the Wiring:
Before installing the new bulb, check the wiring in the light kit to make sure that it is secure and properly connected. If you find any loose or damaged wiring, do not attempt to fix it yourself and seek the assistance of a professional electrician.
By following these safety precautions when changing a light bulb in your Harbor Breeze ceiling fan, you can ensure that the task is completed safely and effectively.
Remember to always prioritize safety over convenience when working on any electrical fixtures in your home.
Also Read: Flush Mount Vs Downrod Ceiling Fan!
Summary
This article provides a step-by-step guide on how to change a light bulb in a Harbor Breeze Ceiling Fan. It outlines the steps needed to safely remove the old bulb and replace it with the new one.
Lastly, the guide provides detailed instructions on how to reconnect the wiring and relight the fan once the bulb is replaced. With this guide, anyone can easily change a light bulb in their Harbor Breeze Ceiling Fan.