Key Points:
- Wiring dryer plugs is the first and foremost task of installing a dryer.
- Based on the number of prongs your dryer plug has, the wiring method might vary.
- Installation of a dryer plug to a breaker box is an easy task that can be accomplished effortlessly.
Often times a dryer plug might not be installed into a home. In such a case it is up to the owner or the resident to either install a dryer plug himself or call a professional to complete the task for them. So, how do you wire a dryer outlet to a breaker box?
There are certain factors that determine the steps knowing how to wire a dryer plug to a breaker box. The first one being the number of prongs your dryer plug contains. After that the steps are simple. Such as turning the power off, wiring the dryer plug to the breaker box and troubleshooting.
Throughout this article, I’ll discuss all of these steps in details. So, let’s head on with the installation procedure.
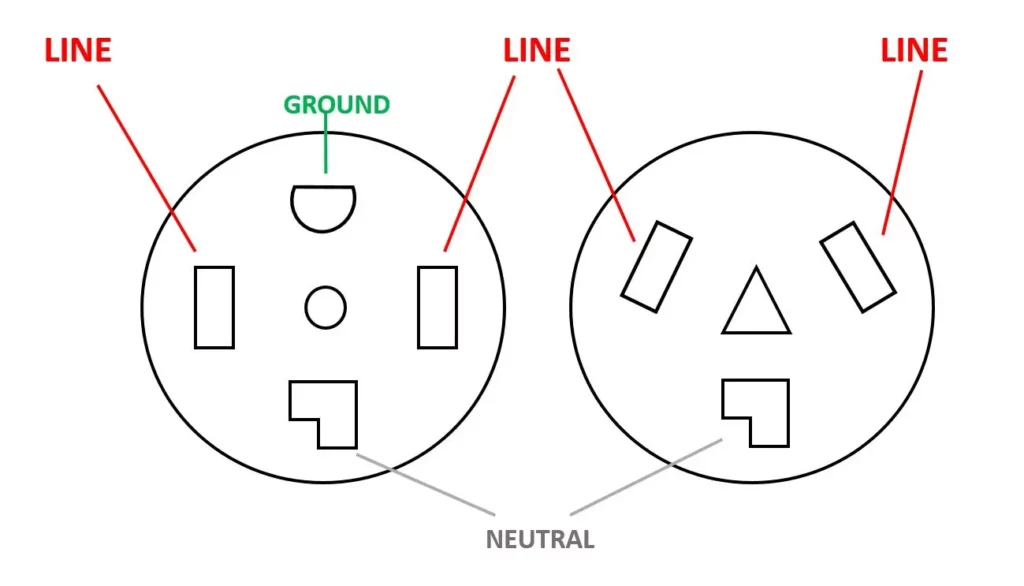
3 Prong or 4 Prong Dryer Outlet?
Before starting the process of wiring a dryer outlet, you must determine the type of outlet you require. So, if you’re trying to figure out how to wire a dryer plug to a breaker box, you must know the differences between the two plug types.
Your dryer plug often might not fit in the receptacle if the number of prongs might not match. This is a common problem that doesn’t mean your home has bad wiring or that you need to buy a new dryer.
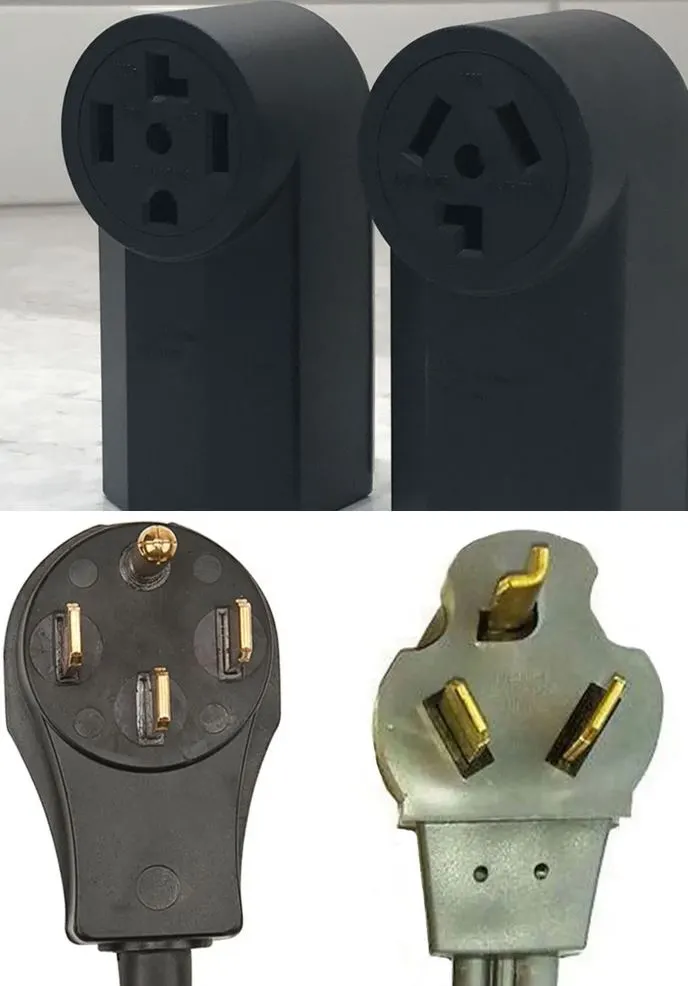
Homes built before the mid-1990s only needed three prong receptacles, but four pronged receptacles were made mandatory to improve safety by reducing the risk of electrical shock.
A common question that many people have is, can you use two single pole breakers for 220?
No, it is not safe. In case of a short circuit on one phase you want the breaker to shut off both hot legs together.
Gathering Necessary Tools
Before proceeding with any electrical tasks, it is highly advised to gather all the necessary tools required for the job. Tools needed for the procedure are listed below.
Required tools for wiring a dryer outlet:
- Screw Drivers: Screw drivers with different heads are required depending on your system.
- Wire Strippers: Wire strippers are used to strip wires before the connection to ensure proper flow pf electricity.
- Rubber Boots and Gloves: Rubber boots and gloves ensure that you remain safe from any electrical hazards during the installation procedure.
- Voltage Testers: Voltage testers ensure that the cables or wires you are working with does not contain any electricity. As it is very risky and dangerous to work with live wires.
Turning Off the Power
The first and most important step in installing any electrical component is to disconnect it from all power sources.
How to turn off the power?
- If you want to switch off the electricity from a local circuit breaker, first figure out which circuit breaker supplies power to the outlet you want to turn off.
- You may also turn off the main breaker, but this would cut off all power in the house.
- Simply turn the switch once you’ve selected the suitable breaker.
- Check the LED indication to ensure there is no electricity to the outlet.
- If there are no indicators, you can examine the circuit with a volt meter or an ammeter.
Wiring the Dryer Plug
The most crucial aspect of any electrical component installation is ensuring that everything is properly connected. However, the connections are different if you’re trying to wire a 3 prong dryer outlet to 4 wire install.
So, how do you hook up a dryer to a breaker box? Take a look below.
How to wire a dryer outlet to the breaker box?
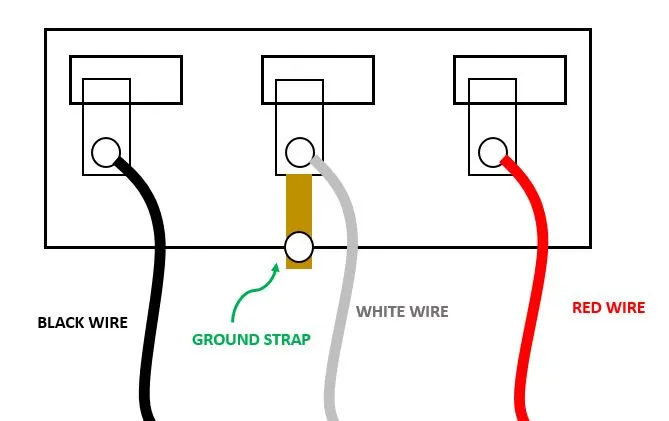
- Determine the type of plug you want to wire. Based on the number of prongs, the wiring will be different (Fig 2).
- Using the wire strippers, strip enough plastic material from the wires to insert it properly into the breaker.
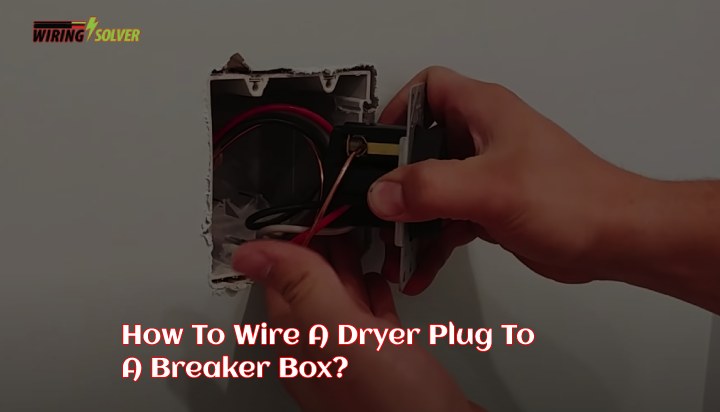
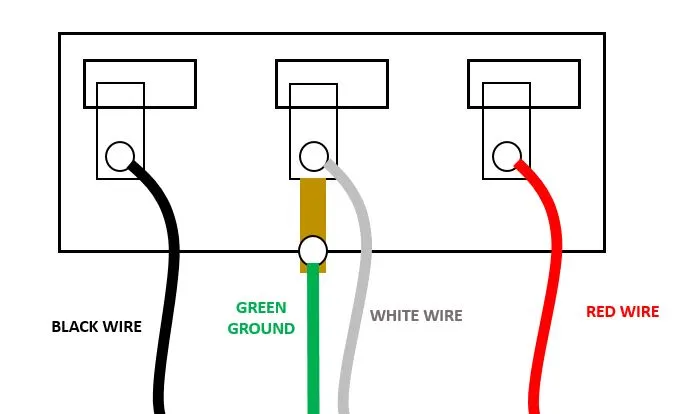
- Insert the black line cable to the breaker load and use a screw and a screwdriver to secure the wire into place (Fig 3).
- Insert the red line cable to the breaker load and similarly secure it properly into place (Fig 3).
- The white wire or the neutral wire has to be secured properly into the middle terminal and secured as well (Fig 3).
- Now, if you have a 3 prong plug, your task is over, but if you have a 4 prong plug, you have to attach the additional ground cable to the terminal below the neutral terminal (Fig 4).
Troubleshooting
It is a crucial step to troubleshoot any electrical component after installation to make sure it is working as intended.
Testing the dryer plug
- Switch on the electricity at the main panel or at the circuit breaker which you turned off at the beginning of the installation.
- Make sure the power is back on by checking the LED indicators of the switchboard.
- Turn on the dryer.
- Make sure the dryer plug is attached properly.
- Try to test run the dryer to make sure that it is working properly.
- Keep an eye out for any overheating or sparks in the breaker box or the plug.
If all the steps mentioned above, checks out perfectly, you can rest assured that you have made a perfect installation of a dryer plug to your breaker box.
Summary
In this article, I’ve gone through all the necessary steps on how to wire a dryer plug to a breaker box. With the step-by-step instructions provided in this post, I hope that connecting a ceiling fan regulator to the switchboard will be simple and straightforward for anyone.
Stay cautious and take all necessary precautions before engaging in any electrical activities on your own.

