If you’re a homeowner or DIY enthusiast, you’ve probably come across a three-way switch at some point. But have you ever stopped to wonder how many different ways there are to wire a three-way switch?
There are 4 ways. These are same box having multiple switches, opposite walls switch box having power from ceiling, 1st switch box nearby light fixture wiring, and switch boxes on same wall.
In this article, you will get to know about some rules to follow before wiring a 3-way switch. The 4 different ways of wiring the switch are discussed along with the diagram and details.
A Few Things to Know before Trying Any of These Wiring Techniques
Consider these tips before wiring a 3-way switch.
- Instead of two terminal screws, a three-way switch would have 3 terminal screws. Some might have holes instead of screws.
- One terminal (known as a common terminal) has a darker color, while the other two are the same (silver or brass commonly).
- The terminal configurations can be different in various three-way switches. Follow the provided instructions for understanding wiring.
- There should be a green screw at any one end. It’s meant for the ground wire usually.
- Can you Wire a 3-way switch with 2 wires types? Yes, you can and those are usually 14/2 and 14/3.
- Attempting any diagram without complete knowledge of safe installation practices is highly discouraged.
- Understand the purpose of each screw terminal and wires.
- The three insulated wires consisting of 14-3 type should be sufficiently available. This one goes with most household lighting circuits of 15 amp.
- For 20-amp breaker or 12-gauge wire, go for the 12/3 type instead.
- Before handling wires that are exposed, make sure to turn the circuit power off.
- Traveler’s white wires end part shall have wrapping with electrical tape. Or you can use a plastic wire nut.
Light Switch Installation & Terminal Screw Matters
So many ways you can wire a 3-way switch! And everything goes in vain without enough idea on these two topics.
As soon as you determine the ideal spot for each wire, you must work on connecting the light switch to right wire. And then get it inside the light switch box installed.
Some light switches would come with tiny back holes. And here the wire is usually pushed into. Also, screws are usually on the side of each switch.
For making connections with the screws, you must get stripped wire end bend and make a half-circle-like shape with it.
Then in a clockwise direction, try wrapping the wire on screw. Finally, you get the screws tight and firm. All the wires go neatly into wall box. And then the switch gets inside the box.
How to Wire a 3-Way Switch – The 4 Different Ways
Here are some ways you can wire a 3-way switch:
1. Same Box Having Multiple Switches
Having the same box for more than just one switch and also, other switches get power available.
Breaking down the Wiring Diagram:
- Current enters through the black wire towards the 1st switch box, attached to the common terminal.
- Down position of the 1st switch means exiting through the red wire and then visiting through traveler terminal into 2nd switch.
- Down position of the 2nd switch means again exiting but this time through 3 way switch common wire black and enters the light.
- Then the current passes in light to later go back into 2nd switch through white wire, which meets another white wire staying between both switch boxes in 3-rope.
- This completes the circuit and light turns on.
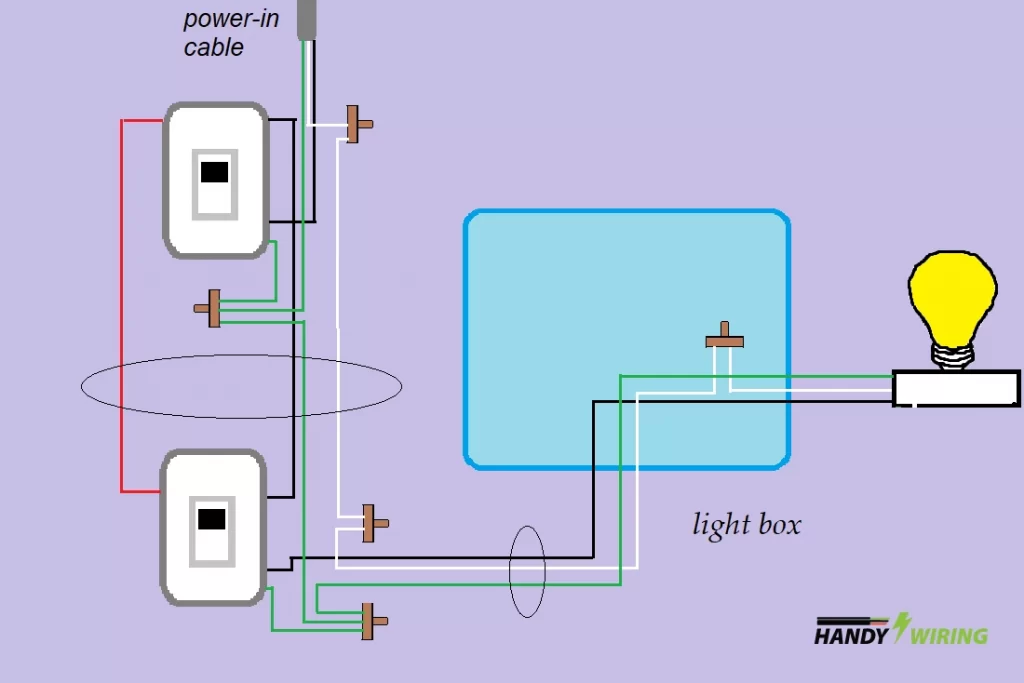
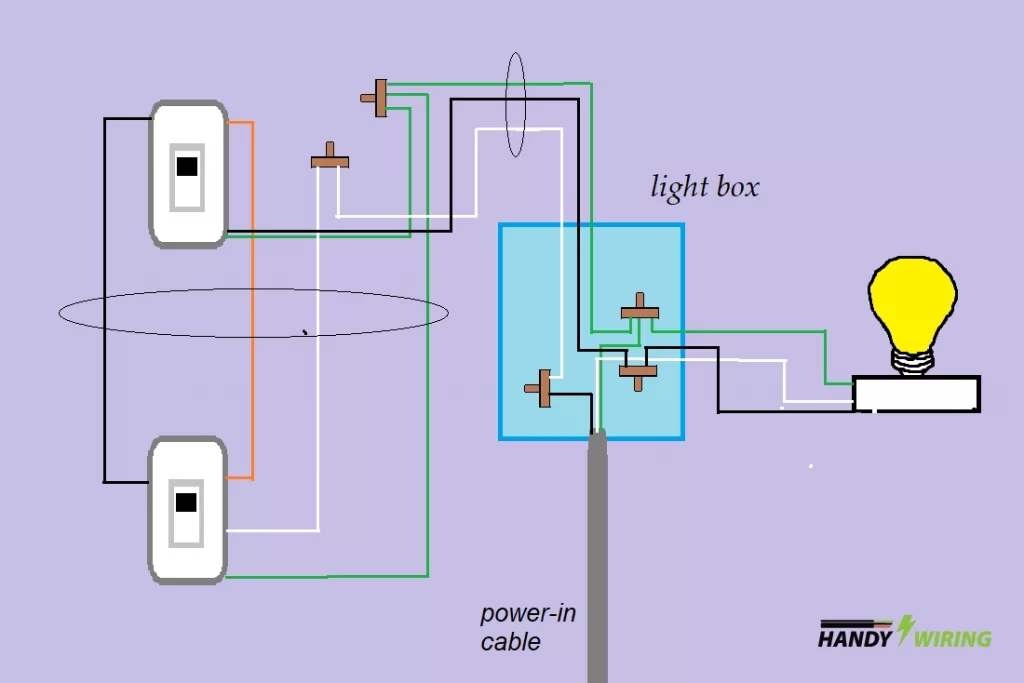
2. Opposite Walls Switch Box Having Power from Ceiling
In this next segment of understanding 3-way switch wiring in many ways, let’s focus on a scene where power supply comes down from ceiling.
And if this is the case, then running the cables in a way that it goes up in light box at ceiling would work best. And the light box would have the power-in line entering it. Have a look at the wiring diagram as well as the explanation.
Breaking down the Wiring Diagram:
- The current enters the light box through black wire.
- Using white wire, it flows next to 1st switch’s common terminal.
- Using a traveler terminal, the current exits from 1st switch and goes back to light box.
- In the light box, current joins another wire that enters the 2nd switch’s traveler terminal.
- After passing through 2nd switch, the current leaves from common terminal.
- It enters the light box once again and light fixture next.
- The neutral directly run to the light fixture from power-in cable.
3. 1st Switch Box nearby Light Fixture Wiring
If you have the light fixture close to 1st switch box, then this is the way to go for. Take a look at the wiring diagram and explanation afterward.

Breaking down the Wiring Diagram:
- The current enters through the common terminal black wire into the 1st switch box.
- In case of 1st switch is up, current would leave box through red traveler wire. It would go through the 2nd switch’s traveler terminal next.
- In case of 2nd switch being up as well, current would leave through white wiring at the common terminal.
- Then it would go back to 1st switch box’s spliced black wire at 2-rope. And then reach to the light fixture.
- After passing through the light fixture, current shall return to 1st switch box own neutral white wire. And it would next go back to the fuse box through returning neutral white wire.
- This will make the light on as circuit is complete.
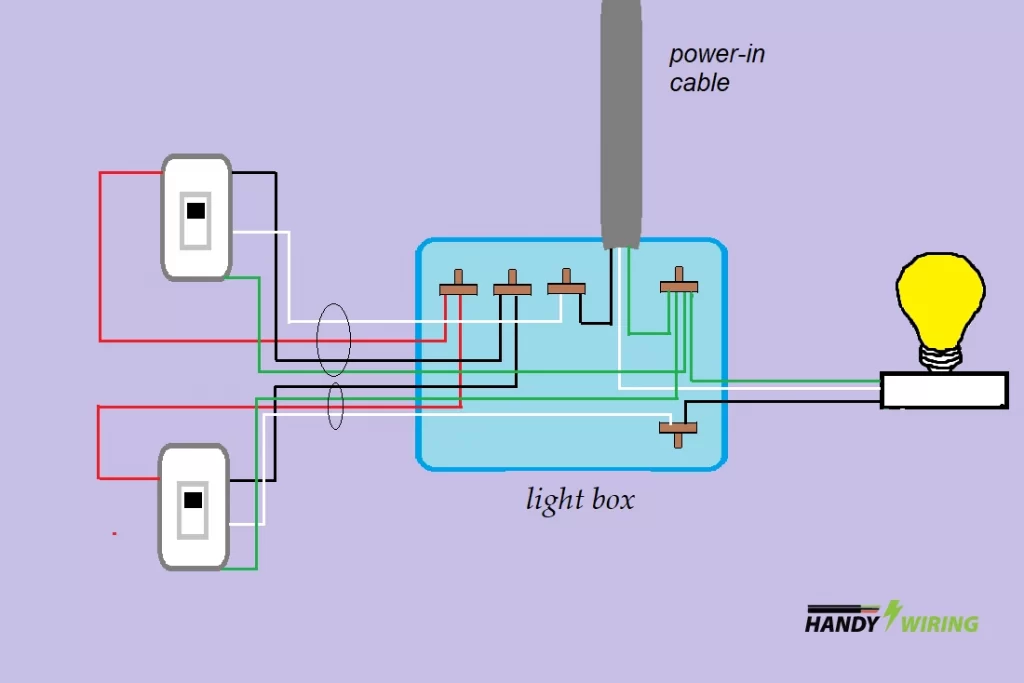
4. Switch Boxes on Same Wall & Several Light Fixtures Sharing Breaker
In this case, the light box is where power in cable would enter. And it works great for several light fixtures that have a common breaker to share.
Breaking down the Wiring Diagram:
- Current travels through the black wire and enters the light box to meet white wire where it splices.
- Then it goes to the 1st switch box through white wire in a 2-rope cable. There it meets the white wire in 3-rope cable. Next, it visits 2nd switch through the common terminal.
- In case the 2nd switch is up, it would leave the switch through the traveler terminal. And then visit the 1st switch on the red wire.
- In case the 1st switch is also up, then the current leaves from 3-way switch common wire that is black in 2-rope cable.
- The current enters the light box. From there it would enter the light fixture next.
- Once electricity passes through the fixture, it leaves on white neutral wire.
- Finally, it returns the power-in cable.
Keep in mind these were about single light fixtures being controlled by the 3-way switches.
Safety Considerations When Wiring a 3-Way Switch
When wiring a three-way switch, it’s important to prioritize safety to avoid any accidents or injuries. Here are some safety considerations to keep in mind:
- Always turn off the power to the circuit before starting any electrical work.
- Use caution when handling wires and switches, as they may be live with electricity.
- Wear protective gear such as gloves and safety glasses.
- Follow the manufacturer’s instructions and local building codes when wiring a three-way switch.
- If you are unsure about any aspect of the wiring process, it is best to consult a licensed electrician.
- Regularly test and maintain your three-way switch wiring to ensure that it is in proper working order.
Summary
In conclusion, wiring a three-way switch can seem intimidating at first, but with the right tools and a clear understanding of the process, it can be a relatively straightforward task.
You should also keep the required tools at your hand. It’s a good idea to have some basic electrical knowledge or to consult with an electrician if you have any doubts about your ability to safely complete the project.

![Wiring a Combination Switch with 2 Wires! [Full Guide]](https://wiringsolver.com/wp-content/uploads/2022/10/Wiring-a-Combination-Switch-with-2-Wires.jpg)