Are you looking for a way to install a 3-way switch but have limited access to wires? If so, you don’t have to worry, as you can still achieve the desired result with just two wires.
Before proceeding with any electrical procedure, make sure to turn off the power and gather the necessary tools. After which you have to decide regarding the wire gauge and proceed with the wiring and finally testing.
This article will guide you through the step-by-step process of how to install a 3 way switch with only two wires. It will discuss the different types of wiring, the different equipment needed, and the process of installing the switch.

How to Install a 3-Way Switch with 2 Wires?
The way you’ll handle the wiring would depend on what sort of results you want to get out of it. For example, can a switch control multiple outlets and how to achieve that with a 3-way type, certain requirements would need a specific type of installation including wiring.
Now the most basic consideration here would be the choice of boxes that would have a feed and load wire.
The first step involves 14/2 wires that you’ll use for supplying power to one of the switch boxes while it runs from electrical panel.
This can be done in two ways.
- With the first method, you can literally provide a direct connection from the panel itself.
- Or you can go for a sub-feed running. It would start from another light circuit that is available at your home.
Never mix the wire gauges while doing the installation. Also, make sure there’s no chance of a particular circuit overloading.
I won’t go in-depth about how the wire should run, as that’s quite something you must already know to be eligible in doing such wiring tasks.
However, if you have no idea about it, stop here and talk to a professional. This task is too risky to handle without enough basic knowledge.
Anyways, before entering the wiring section, keep in mind the two most important parts.
- First of all, you should run a 14/2 wire into switch box from the light.
- Secondly, between the two-switch box, you must use a 14/3 wire.
This will bring you to each switch box having one of both wire types. For first switch box, the 14/2 is a feed wire.
And the 14/3 wire would visit the other switch box. With the second box, 14/3 will be again in charge of visiting other switch box. However, the 14/2 wire visits light.
3 Way Switch Wiring Diagram with Instructions to Follow
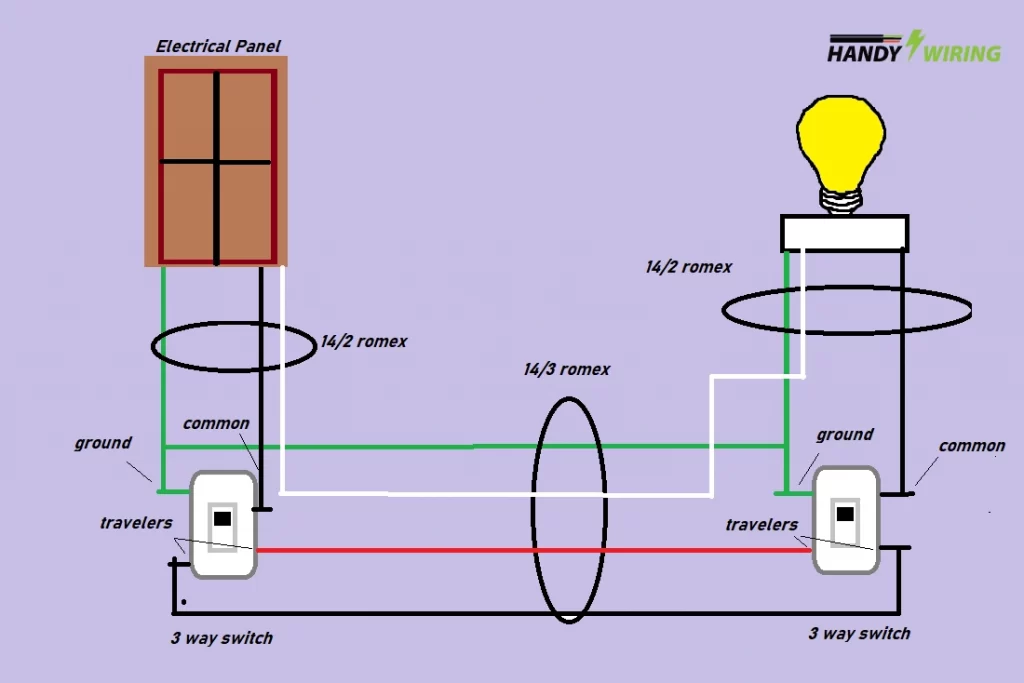
You can follow the below provided traditional 3 Way Switch Wiring Diagram along with the instructions to get things installed right.
Fig 1- Wiring Diagram for a 3 Way Switch
1. For The 1ST Switch
The two white wires need to be connected. You can use a wire nut to do so. From the 14/2 feed wire, get the black wire. You want to connect that with the black common screw next.
Now move to the 14/3 wire and get both red and black wires. Connect them to the two gold or silver screws. Those should be located opposite to each other. The wire going to a specific screw, is not something you need to worry about here.
Connect both ground wires to the ground screw after twisting them together. The green wire nut that comes with hole, you can use that for the purpose. So that any ground wire can get through the nut. And the switch hooking up afterwards becomes easier for you.
Finally, tuck all the wires into box for a neat look. And install the switch box. You can also use electrical tape to wrap switch screws. So that there’s some extra security.
2. For The 2nd Switch
Similar to what we did with the 1st switch. Connect both white wires, connect 14/2 wire’s black wire to light’s black common screw. Have the black and red wires of 14/3 attach with silver or gold screws.
Attach the ground wires to the ground screw by using green hole wire nut. Tuck those wires nicely and get the switch box installed. The same electrical tape goes around screws. And that’s it.
3. Wiring The Light
Connect the similar colored wires to each other and that’s it for light wiring. Also, the feed wire should be pulled inside the electrical panel.
You can also try tying those into another circuit of light. Just make sure there’s no connection done to breakers that are above 15 amps.
How Can I Test the 3-Way Switch?
Once the 3-way switch has been installed and the wires connected, it’s important to test it to ensure it’s working properly. Here’s how to test a 3-way switch:
- Turn off the power supply to the switch at the circuit breaker or fuse box.
- Confirm that the power is off by testing the switch with a voltage tester.
- Turn on a light or plug in a lamp to the switch.
- Turn the light or lamp on, and then use the switch to turn it off and on. If the switch is working correctly, the light should turn on and off when you flip the switch.
- Repeat this process with the other switch to make sure both switches are working correctly.
- If the switches are not working as expected, check the connections to ensure that all wires are connected properly and securely.
It’s important to make sure that the 3-way switch is working correctly before you turn the power supply back on. This will help prevent any potential electrical hazards.
Summary
In conclusion, installing a 3 way switch with two wires is possible and can be done with the right equipment and knowledge. With the right tools and process, you can easily install a 3 way switch with two wires.
I hope this article has been helpful in guiding you through the process of how to install a 3 way switch with two wires. Now, you can enjoy the convenience and efficiency of a 3 way switch without having to worry about access to numerous wires.


![How To Wire A 240v Double Pole Switch? [Explained]](https://wiringsolver.com/wp-content/uploads/2022/09/Wiring-a-240V-Double-Pole-Switch.jpg)

![Kasa Smart Switch TroubleshootIng! [Complete Guide]](https://wiringsolver.com/wp-content/uploads/2022/10/How-to-Troubleshoot-a-Malfunctioning-Kasa-Smart-Switch.jpg)