Key Points:
- It is necessary to properly identify the terminals of the 3 pronged toggle switch in order to properly wire the switch.
- The terminals (Power, Acc & Neutral) have to be wired accordingly in order for the switch to work properly.
- It is strictly advised to wear safety gear such as rubber boots and gloves to avoid any sort of electrical hazards.
If you’ve ever used a toggle switch, you’ll notice that there’s one thing that’s always clear when it comes to wiring it. Which is the fact that two prong rocker switches differ from three prong rocker switches.
While the former is a typical switch and so needs a basic wiring method, the later may require you to take more cautious steps before it will operate in any electrical equipment or appliance. If you’re wondering how to wire a 3 prong lighted toggle switch, look no further.
There are a few steps to properly wiring a 3 prong lighted switch. They are as follows, turning off the power and prepping the cover plate, removing the old cover plate/switchboard, identifying the terminals on the switch, connecting the wires to the switch and troubleshooting.
In this article, I’ll go over these steps in detail in order to give you a thorough understanding of the entire procedure. So, let’s begin.

Guide for Wiring a 3 Pronged Lighted Toggle Switch:
The task of installing a 3 pronged lighted toggle switch is simple. These steps below will take you through the whole process in details.
1. Turning Off the Power
Before proceeding with the installation, you must turn the power off and open the old cover plate from the switchboard. Depending on your chosen toggle switch, you might need to replace the cover plate in the finishing steps.
How to turn off the power?
- Locate the main breaker of your household and currently identify the breaker that supplies power to the switch/terminal you are about to work on.
- Flip the switch after you have correctly identified the accurate breaker.
- To make certain of the fact that the power has ceased to flow, check the LED indicators of the board.
- If your board does not have an LED indicator, you can use tools such as an ammeter, voltmeter etc. to check if electricity is still flowing after removing the cover plate (if any).
- Use rubber boots and gloves for proper safety from any electrical hazards or accidents.
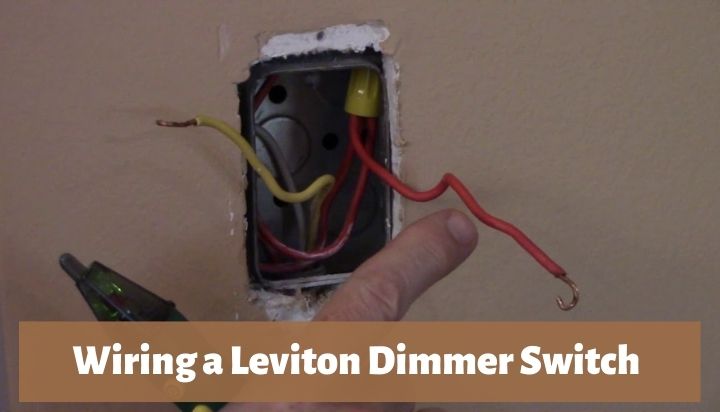
2. Removing the Old Cover Plate and Switch
If you have a previously installed switch, that you want to replace, you have to open the cover plate and remove the switch. This is because the new toggle switch might not fit in the place for the old one.
Also, it gives you more access to the wires. And depending on your setup, you might need to remove the cover plate to screw the switch into the wall.
How to remove the cover plate?
- If the old cover plate has been painted on, use a utility knife to softly score along the perimeter of the plate to cut through the paint.
- Remove the screws from the cover plate using an appropriate screwdriver.
- Then pry it up with a tiny flat-blade screwdriver. Be cautious of the electrical wires.
- Now again make sure that the wires do not have any electricity flowing.
3. Identification of Switch Terminals
It is crucial to properly identify the terminals on a toggle switch in order to know how to wire a 3 prong lighted toggle switch. Because to properly wire the switch, you must know, which wire you should connect to which terminal.
Proper identification of the terminals is a must step for proper installation of any electrical component. Even if you’re trying to figure out how to wire 220v plug with 3 wires, you have to properly identify the terminals and wires.
How to Identify the Terminals on a Toggle Switch?
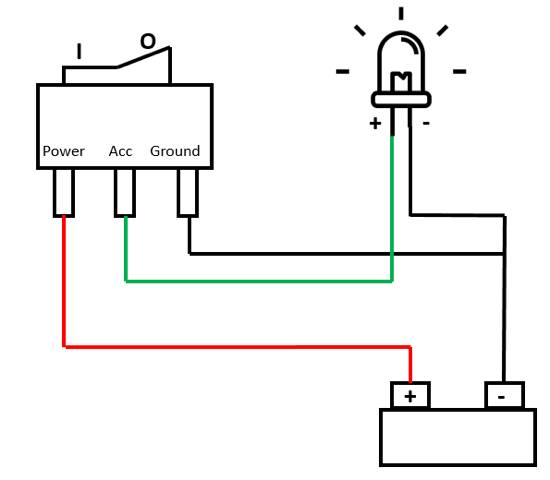
- The three terminals on your switch are Power, Accessories or Acc for short and Ground.
- The power terminal is where the positive wire should be connected.
- The ground terminal should be connected to the neutral/ground wire.
- The Acc or accessories terminal, should be connected to the positive of the electrical component that you wish to operate (such as lights, fans etc.)
- The ground/neutral terminal can be identified by the brass terminal.
- The terminal which is the furthest from the ground terminal should be the Power terminal and has to be connected to the positive wire.
- The middle terminal is mostly always the Accessories or Acc terminal.
- If you have any confusion, you can find inscriptions etched into the switch as well, which will help you identify them easier.
4. Connecting the Wires
In order for the switch to work properly, you have to complete the wire connections accurately. Wire connection is a crucial step for wiring up any plug, switch or outlet. Such as knowing how to wire a 3 prong dryer outlet to 4 wire etc.
Wiring a Toggle Switch
- Locate if there are black and red wires, usually the black wire is always neutral and red is the positive wire.
- You can also use a volt meter or an ammeter accordingly to check the polarity of the wires.
- Connect the black wire to the ground terminal of the switch.
- Connect the red wire to the power terminal of the switch.
- Connect the positive wire of your appliance (light, fan etc.) to the Acc terminal of the toggle switch.
- You can use electrical tape to secure the connections properly.
If for any reason the installation requires you to convert phases, you have to know how to convert 3 phase to single phase 220v beforehand.
5. Troubleshooting
It’s critical to troubleshoot any electrical component once it’s been installed to ensure it is operating properly.
Testing the toggle switch
- Turn on the power at the main panel or the circuit breaker that you shut off when you started the installation.
- Check if the LED on the switch is turned on or not. If it is turned off, you have to properly check the wiring again.
- If the LED indication is turned on, flip the switch and check if the appliance is working or not.
Summary
Throughout this article, I have discussed all of the steps necessary to know how to wire a 3 prong lighted toggle switch. The steps have been discussed in detail, so that you find it easy and simple to do this task yourself.
But, as common with any electrical work that you might be involved in, you should exercise extreme caution and take all of the necessary safety steps beforehand. Such as, using proper rubber gloves and boots, and using necessary tools to make the installation process easier and accurate. Because faulty wiring can cause serious accidents and electrical hazards.
![Eaton 4-Way Switch Wiring With Diagram [Complete Guide]](https://wiringsolver.com/wp-content/uploads/2022/10/Wiring-Diagram-with-Instructions-for-an-Eaton-4-Way-Switch.jpg)

![Guide to Getting Power from an Outlet to a Switch! [Complete Guide]](https://wiringsolver.com/wp-content/uploads/2022/09/Getting-Power-from-an-Outlet-to-a-Switch.jpg)
