Capacitors are an essential part of a ceiling fan. Hunter fans are no exception. And as with all electrical components, capacitors are also prone to failure. Therefore, if the capacitor of your ceiling fan has failed, you must get it replaced.
That brings us to the question, how to replace Hunter ceiling fan capacitor?
One might begin the process by acquiring the necessary tools as the first step. The second step is to turn off the power to the circuit. And then he can move on to removing the old capacitor and wiring the new one inside the ceiling fan.
I will try my best to ensure that this article is comprehensible enough for any user to take up the task for himself. As the procedure is not that hard.
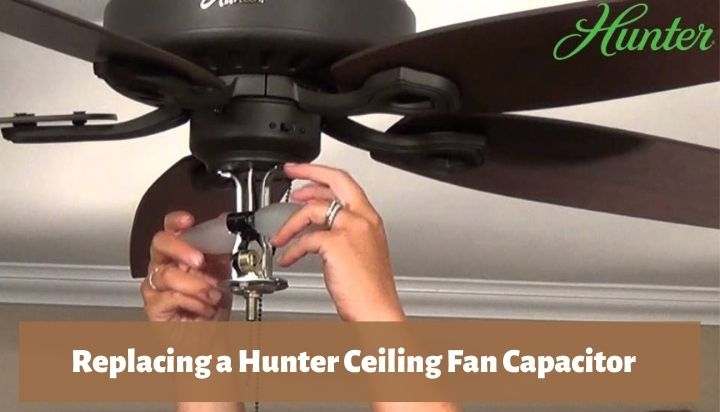
Replacing a Hunter Ceiling Fan Capacitor – Full Guide
The entire procedure of replacing a Hunter ceiling fan capacitor will be provided below. I will also attach a wiring diagram in the appropriate section for the convenience of the reader.
1. Gathering Necessary Tools
The first step is to gather a couple of components and equipment for the procedure. I will list them below.
List of Equipment and Components Necessary:
- Replacement Capacitor
- Wire Stripper
- Electrical Tape
- Voltage Tester
- Wire Nuts
- Rubber Gloves and Boots
Before beginning the operation, you ought to be certain to acquire an adequate capacitor. The rating needs to be appropriate for your Hunter ceiling fan.
If you don’t do that, it won’t operate, and it can even end up damaging your ceiling fan. You can learn the appropriate rating from the body of the old capacitor or from online guides.
2. Turning Off the Power
If you wish to know how to replace Hunter ceiling fan capacitor, you must first turn off the power to the circuit on which it resides. As it is extremely dangerous to work with live wires.
How to turn off the power?
- Use rubber boots and gloves for proper safety from any electrical hazards or accidents.
- Locate the main breaker of your household and currently identify the breaker that supplies power to the Hunter ceiling fan you are about to work on.
- Flip the switch after you have correctly identified the accurate breaker to turn the power off.
- To make certain of the fact that the power has ceased to flow, use the voltage tester.
- After you have ensured that the power has ceased to flow to the ceiling fan, you may move on to the next step which is to remove the old capacitor.
3. Removing the Old Capacitor
Before we can install the new capacitor we must first remove the old one. The process is detailed below.
*Note: Each model is different and the process might differ according to individual models. The most general outline is provided here.
How to remove the old Hunter capacitor?
- A tiny, black, rectangular box that is attached directly to the switch houses the capacitor. You must take off the light kit if the fan has one to get to the fan motor and capacitor.
- Remove the screws securing the fixture that houses the fan, then unscrew and remove the bulbs.
- Lower the fixture away from the fan and disconnect the wires.
- Once the motor is exposed, you’ll see the capacitor, which is usually mounted close to the pull switch if the fan has one.
- There may be two to five wires on the capacitor. The best technique to separate the capacitor is to cut the wires because they are typically firmly attached to the motor parts.
- Cut as close to the capacitor as possible to give yourself plenty of wire to connect the new capacitor.
- It’s very important to remember which wires are connected because the color coding on the fan may not match that on the capacitor.
4. Wiring the New Capacitor
As mentioned before, the process may vary based on different fan models. I will outline the basic wiring method for a Hunter ceiling fan. The steps are provided below.
Steps to installing a new capacitor:
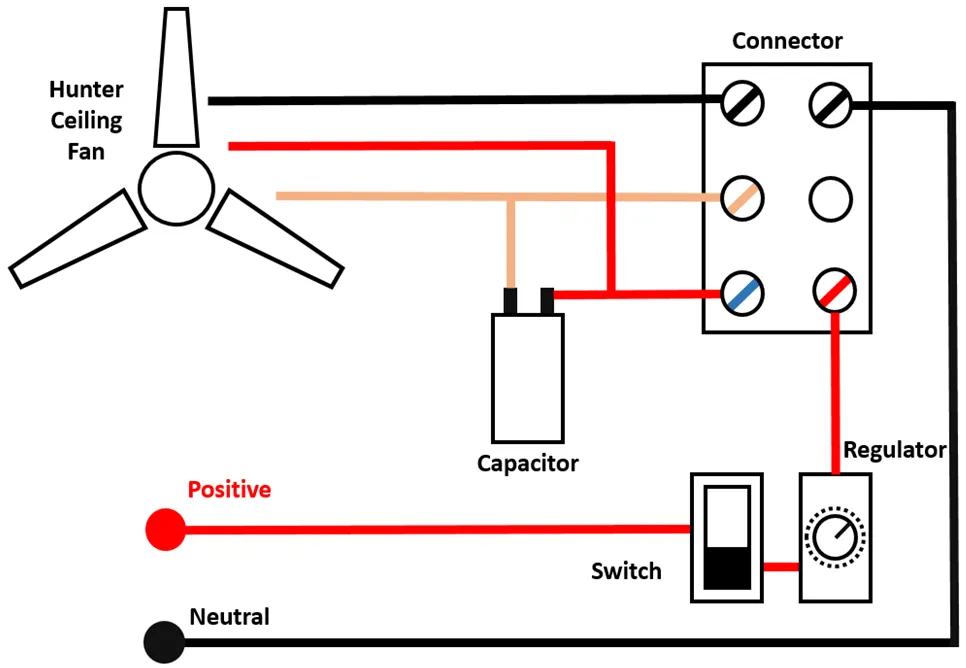
- The power comes to the switch through the positive cable and flows to the regulator and then to the connector. If you do not have a regulator, you may connect it directly to the connector after the switch.
- The negative wire goes directly to the connector.
- Make sure the wires are properly stripped to ensure a secure connection.
- Connect the positive end of the capacitor to the positive terminal of the connector.
- The positive wire of the ceiling fan also goes to this terminal.
- Connect the other end of the capacitor to a blank terminal on the connector.
- Connect this terminal to the ceiling fan.
- And finally, connect the ceiling fans’ neutral wire to the neutral terminal on the connector.
- Make sure all the connections are secure and no wiring is exposed.
Troubleshooting the Hunter Ceiling Fan Capacitor
It is crucial to troubleshoot all electrical components after installation to make sure that they are working properly. Otherwise, it could lead to electrical hazards.
The steps to troubleshooting a new capacitor on a Hunter ceiling fan are provided below. These steps will vary from troubleshooting a Hunter ceiling fan rather than the capacitor.
How to troubleshoot a replaced capacitor?
- Turn the power on from the main service panel.
- Make use of a voltage tester in order to determine whether or not the power has been reinstated.
- Turn on the Hunter ceiling fan with the appropriate switch, remote, or pull chain.
- If the fan goes on, you need to use the regulator to establish whether or not you have sufficient control over the speed of the ceiling fan. If you do not, there might be an issue.
- If you get a positive response to this question, it indicates that the installation was performed in the appropriate way.
- In the event that this is not the case, turn off the power and examine the wiring to determine whether or not it was carried out properly.
Summary
I have mentioned all of the necessary steps in detail for how to replace Hunter ceiling fan capacitor. The steps to troubleshooting the installation have also been mentioned in this article.
You have the option of using the services of a qualified electrician instead, in the event that the process continues to leave you feeling confused or perplexed. Owing to the fact that electrical operations might be dangerous if they are carried out without enough knowledge of the methods.
![How to Make Ceiling Fan Light Brighter? [Complete Guide]](https://wiringsolver.com/wp-content/uploads/2021/09/How-to-Make-Ceiling-Fan-Light-Brighter-Solved.webp)