The process of wiring a ceiling fan with light and remote control isn’t as difficult as it seems. Can you wire a ceiling fan that can be controlled with a remote control? How to wire a ceiling fan with remote and wall switch?
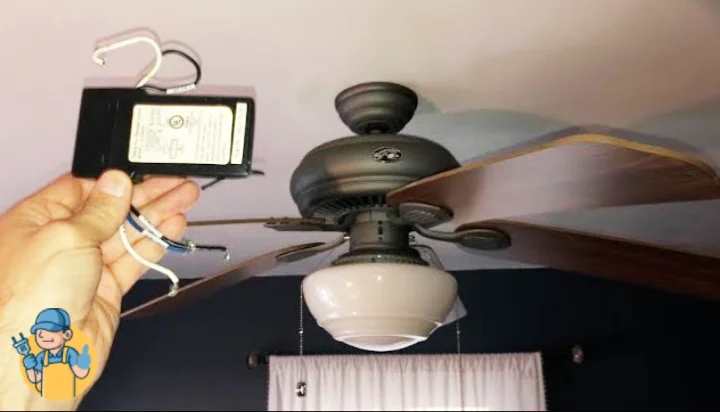
A remote-controlled fan with light works with a transmitter and a receiver. While the transmitter transmits signal from the remote at your hand, the receiver receives the control signal with the help of a small antenna.
You can either wire a new ceiling fan connection that’d work with remote or use aftermarket kit to work with your existing fan.
This article will discuss more on how to wire a ceiling fan with light and remote control with required wired diagram so that you can do the whole process all by yourself.
Let’s begin then!

Wire a Ceiling Fan with Light and Remote Control:
Well, ceiling fan with light has already become widely popular because of the convenience they offer. Conventional ceiling fans make noise, require lots of maintenance, and most importantly don’t give you the luxury to change speed from laying down on the bed.
That’s why people are becoming more interested in ceiling fan wiring controllable by remotes. Here are the steps that you need to follow for wiring a ceiling fan with light and remote control.
Step 1: Ensure Safety Before Starting
The first thing you need to do for wiring a ceiling fan with remote is to flip-off the circuit breaker that powers the switch where you want to mount the fan. You can also double check to ensure it is off by getting up to the ceiling fan with the help of a ladder.
Bring out a non-contact voltage tester to hold it to the wiring. If the tester glows with bright orange or red color combining with a loud beep, there’s still high voltage passing through the wiring. If there’s no such indication, it’s safe to start with the process.
Step 2: Connect to The Ground
When you take all the safety measures, you need to start with the connection. First, connect the green or yellow colored wire to the ground wire of the DB box of your household.
This is called grounding. It ensures that there’s no short circuit within the connection.
Step 3: Connect Wires
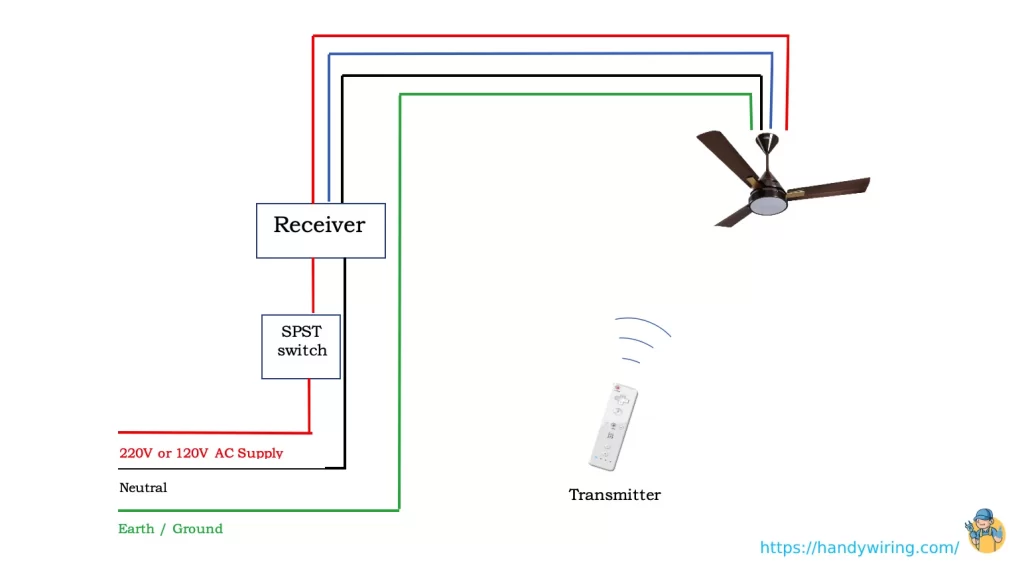
The receiver comes with two incoming and three outgoing wire connections. The built-in light in the fan is connected to the receiver through the blue colored wire from the light to the receiver.
As we all know black wire is used to connect to neutral, connect the black wire of the fan to the black wire of the receiver that connects to the neutral.
Then, connect the red ceiling fan wires and receiver that goes to the 220V or 120V AC supply wires through a single way SPST switch in series.
You can follow the ceiling fan wire diagram as given below for the connection.

Step 4: Turn on the Circuit Breaker
Once you are finished with connecting wire for ceiling fan as the ceiling fans wiring diagram, turn on the main circuit breaker that provides power supply.
Step 5: Turn on the Fan with Light
Make sure to insert batteries in the remote to work. Then, start controlling the fan with light with the remote as you expected. You might be interested in how to make ceiling fan lights brighter.
Frequently Asked Question (FAQs)
1. When installing a ceiling fan what is the red wire?
The red wire works as the conductor wire of one switch when installing a ceiling fan with remote. A switch energizes the red wire that causes the fan to turn on.
2. Where does the red wire go on a ceiling fan with remote?
When installing a ceiling fan with remote, connect the red wire in the ceiling to the black wire within the light kit. Then, connect the black wire of the ceiling to the black wire of the fan.
Conclusion
So, now you know how to wire a ceiling fan with remote and wall switch, isn’t it?
Wiring the fan with light isn’t as complicated as it seems once you know how to do it correctly. I hope the article regarding how to wire a ceiling fan with light and remote control helps you with the proper instructions.
So, why wait any long? Start connecting a ceiling fan with light that you’ve been waiting for long.
Thanks for reading. Have a great day!


![How To Wire A 240v Double Pole Switch? [Explained]](https://wiringsolver.com/wp-content/uploads/2022/09/Wiring-a-240V-Double-Pole-Switch.jpg)


