There could be many switches installed in your home, each serving a different function. There are standard switches, switches with double poles, four-way switches, and even wireless switches.
But wiring them might not be straightforward. Such as Eaton 4-way switches. So, an Eaton 4 way switch wiring diagram may help in this endeavor.
The wiring of a 4-way switch might seem confusing at first as the wiring process is a little trickier than installing conventional switches. Turning off the main power is the first step, followed by wiring the multiple switches involved, and finally, troubleshooting.
I’ll provide detailed instructions alongside the diagram, on how to properly wire and install an Eaton 4-way switch.
Steps to Wiring an Eaton 4-Way Switch
1. Gathering Necessary Tools
There a quite a few different tools that you would need before proceeding with the installation of the switch. These tools and equipment are mentioned below.
Which tools are necessary to wire an Eaton 4-way switch?
- Rubber Gloves
- Rubber Boots
- Screwdrivers
- Wire Strippers
- Voltage Testers
- Electrical Tape
- Extra Wires
- Three Way Switches
2. Turning off the Power
You must turn off the electricity, shutting off the supply to your entire house before installing an Eaton 4-way switch. This is because you will have to work on multiple separate circuits. Therefore, all of them must have their power turned off.
How to turn off the power?
- Locate the main breaker of your household and identify the breaker that supplies power to the entire panel.
- Flip the switch after you have figured out the proper circuit breaker.
- To check whether the power has turned off, you may check the LED indicators of your electric panels.
- If your board does not have an LED indicator, you can use a voltage tester to test for power.
- Take necessary safety precautions before proceeding with any electrical operations. Such as wearing rubber boots and gloves.
3. Identifying the Terminals of an Eaton 4-Way Switch
Knowing how to wire a 4-way Eaton switch requires being able to correctly identify the terminals of the switch. Because you need to know which wire goes where on the switch to wire it properly.
Knowing how a 4-way switch works will also help you out in this endeavor.
How to Identify the Terminals on an Eaton 4-Way Switch?
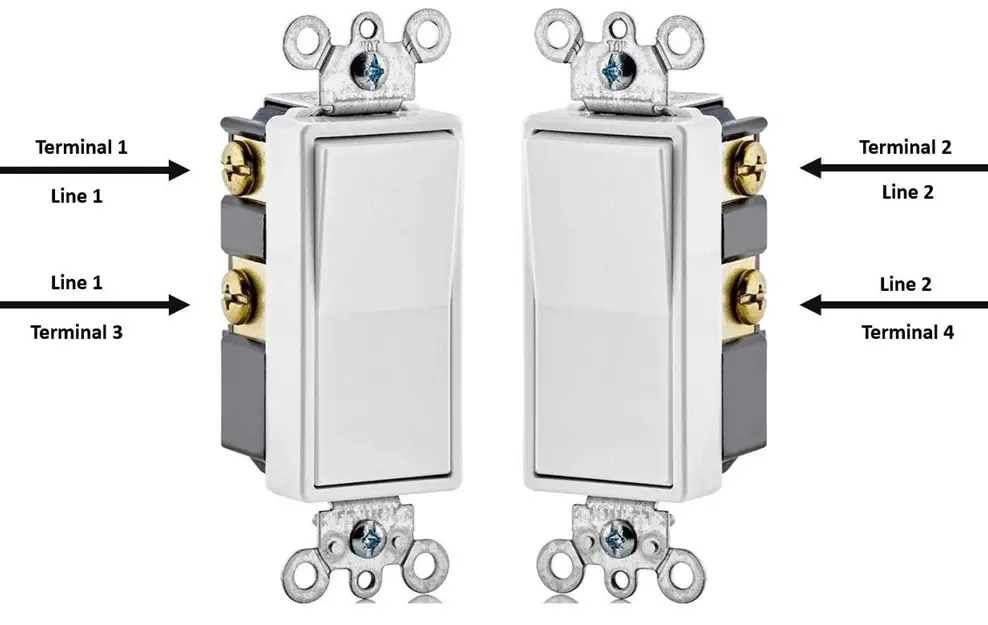
- There are 4 terminals on a 4-way Eaton switch (Fig 1).
- 2 of these are connected by each position of a switch.
- If flipped on the upper side, the circuit on line 1 is completed through terminal 1 and terminal 3.
- When flipped on the bottom side, the circuit on line 2 is completed through terminal 2 and terminal 4.
- When wiring, we must take note of each of these terminals properly. Because one terminal will be connected to the positive and the another will be connected to the negative. The two other wires will be connected to either a 3-way switch or a 4-way switch.
4. Wiring an Eaton 4-Way Switch
For the Eaton 4-way switch to work properly, you have to complete the wire connections accurately. Hence, wire connection is a crucial step.
So, how to wire a 4-way Eaton switch?
Wiring Instructions for an Eaton 4-Way Switch
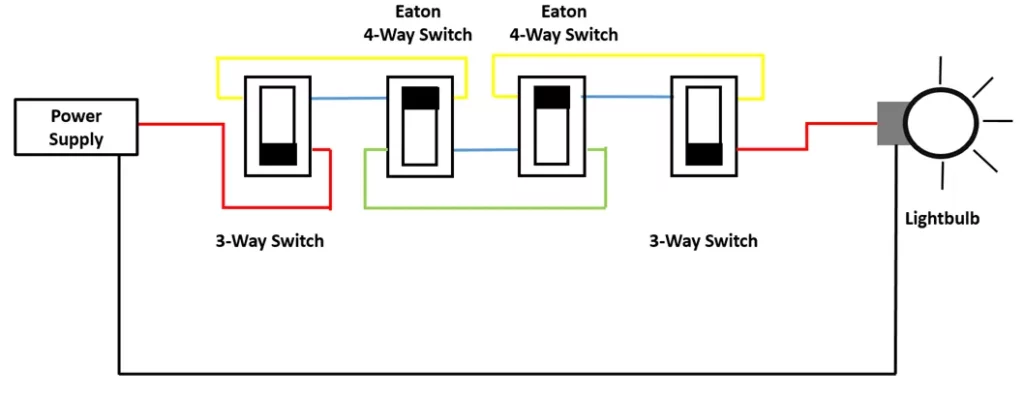
Note: Switch 1 is the leftmost one, and switch 4 is the rightmost one.
- Installing the first switch will require you to locate the switchboard.
- Before moving on to the next step in the method, you need first collect the necessary tools.
- To further ensure that electricity is not flowing, use a voltage tester that does not require physical contact.
- Using a wire stripper, remove a portion of each wire measuring approximately a third of an inch.
- You will require a total of four switches: two 3-way switches and two Eaton 4-way switches.
- To get started, select the appropriate setting on the three-way switch. Utilizing one of the power supply’s connectors, connect it to the source of electricity.
- Connect the two remaining connections to the remaining two terminals of switch number 2.
- The rest two terminals of switch number 2 will be connected to switch number 3.
- Both switch numbers 2 and 3 have to be Eaton 4-way switches.
- Connect the two wires to the terminals of switch 4.
- Switch 4 will have another empty terminal, connect it to the light or device you wish to control with the switches.
- Connect the other end of the device to the negative end of the power source.
- Make sure you have an extra set of wires to interconnect the switches together.
- If the steps seem a bit confusing, follow the diagram (Fig 2) provided above for clarification.
Troubleshooting
Even an Eaton 4-way switch requires troubleshooting after it has been installed in order to ensure that it is operating effectively, and this process is a crucial step. The following is a list of the procedures that need to be taken in order to troubleshoot an Eaton 4-way switch.
Troubleshooting the Eaton 4-Way Switch
- After you have finished installing everything, you should go back to the main circuit breaker and turn the power back on.
- Check to see that each of the four toggle switches is operating as it should. They should each have their own individual control over the switch to turn it on and off.
- Try turning the light or device on by cycling through each of its switches.
- Try to turn off the gadget by consequently flicking each of the switches.
- If each of the four switches functions as it should, then the installation was carried out correctly.
- If that is not the case, you might need to double-check the wiring. Also, rewire if it is necessary.
Summary
If you wanted to learn about how to wire or install an Eaton 4-way switch, I hope that this article was able to help you. I have also provided an Eaton 4 way switch wiring diagram. So that you may find it easier to make the connections.
In the event that, despite this information, the process continues to appear intimidating or perplexing, do not be afraid to seek the guidance of an expert electrician. Considering the fact that a person should never try their hand at working with electricity if they do not possess adequate information or self-assurance in their abilities.
![Double Light Switch Not Working!! [Solved]](https://wiringsolver.com/wp-content/uploads/2022/08/Fix-Double-Light-Switch-Not-Working.jpeg)
![Wiring a Combination Switch with 2 Wires! [Full Guide]](https://wiringsolver.com/wp-content/uploads/2022/10/Wiring-a-Combination-Switch-with-2-Wires.jpg)