Most of us are commonly familiar with the general toggle switch. As it is an essential part of our residence and everyday life. However, there are other different types of switches. Such as wireless switches or smart switches.
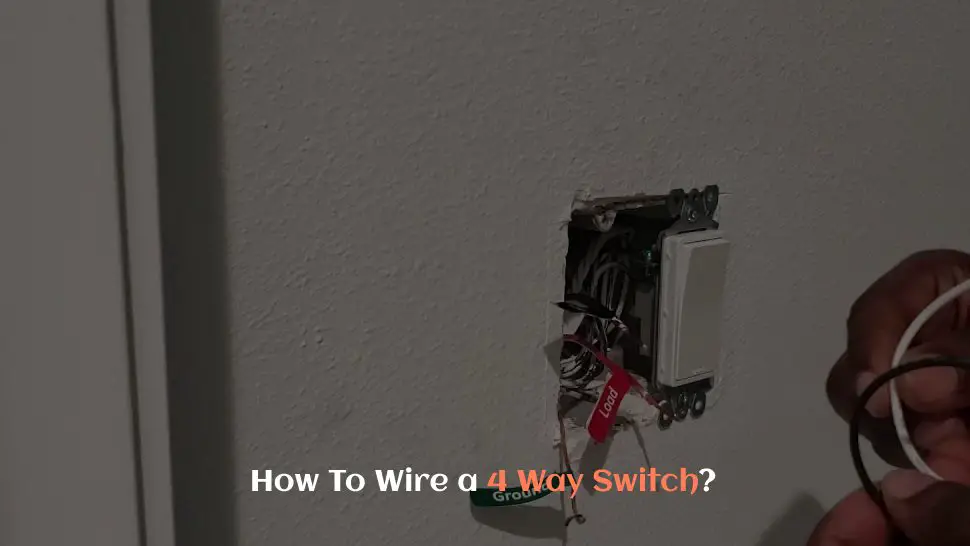
Or switches that may look like ordinary switches, but function in a special manner. This brings us to our topic for today. What are 4-way switches? And how to wire a 4 way switch?
There are a few steps to properly wiring a 4-way switch. The wiring procedure is a bit more complex than installing regular switches and involves 3-way switches as well. The steps include turning off the main power, understanding the terminals of the switch, wiring, and troubleshooting.
Throughout this article, I will talk about how you can wire a 4-way switch on your own. As well as the steps to properly troubleshoot the 4-way switch after installation.
Turning Off the Power
Before proceeding with the installation of a 4-way switch, you must turn the power off, cutting power to your entire residence. As you’ll be working with multiple circuits. So it is necessary to shut down the power in all of them.
Turning Off the Power to the Household
- Locate the main breaker of your household and identify the breaker that supplies power to the entire panel.
- Flip the switch after you have figured out the proper circuit breaker.
- To check whether the power has actually turned off, you may check the LED indicators of your electric panels.
- If your board does not have an LED indicator, you can use a voltage tester to test for power.
- Take necessary safety precautions before proceeding with any electrical operations. Such as wearing rubber boots and gloves.
Switch Terminals and Their Functions
It is crucial to properly identify the terminals on a 4-way switch in order to know how to wire a 4 way switch. Because to properly wire the switch, you must know, which wire you should connect to which terminal.
How to Identify the Terminals on a 4-Way Switch?
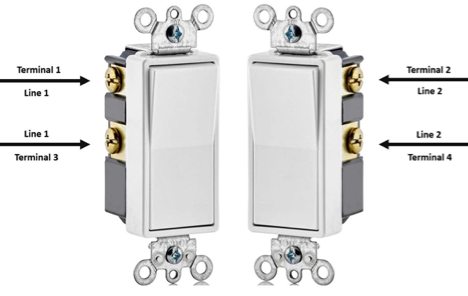
- There are 4 terminals on a 4-way switch (Fig 1).
- 2 of these are connected by each position of a switch.
- If flipped on the upper side, the circuit on line 1 is completed through terminal 1 and terminal 3.
- When flipped on the bottom side, the circuit on line 2 is completed through terminal 2 and terminal 4.
- When wiring, we must take note of each of these terminals properly. Because one terminal will be connected to the positive and the another will be connected to the negative. The two other wires will be connected to either a 3-way switch or a 4-way switch.
You will also need two 3-way switches for the installation procedure. They work kind of similar to the 4-way switches. But instead of 4 terminals, they tend to have 3 terminals.
One terminal is connected to the positive wire or the power source, the other two terminals are connected to the other switches. And by flipping the switch you simply change the direction of power from one terminal to the other one.
Wiring the 4-Way Switch:
In order for the 4-way switch to work properly, you have to complete the wire connections accurately. Wire connection is a crucial step. However, if you wish to know how to wire a 4 way switch with multiple lights, the steps will be a bit different.
Wiring Instructions for a 4-Way Switch
- Locate the switchboard for installing the first switch.
- Gather appropriate tools before proceeding with the procedure further.
- Use a non-contact voltage tester to further make sure there is no electricity flowing.
- Using a wire stripper, strip away about 1/3rd of an inch of each and every wire.
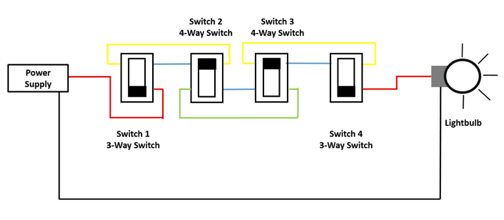
- You will need two 3-way switches and two 4-way switches.
- Take the 3-way switch first. Attach one terminal of it to the power source.
- Attach both the other terminals to two other terminals of switch number 2.
- The rest two terminals of switch number 2 will be connected to switch number 3.
- Both switch numbers 2 and 3 have to be 4-way switches.
- Connect the two wires to the terminals of switch 4.
- Switch 4 will have another empty terminal, connect it to the light or device you wish to control with the switches.
- Connect the other end of the device to the negative end of the power source.
- Make sure you have an extra set of wires to interconnect the switches together.
- If the steps seem a bit confusing, follow the diagram (Fig 2) provided above for clarification.
If for any reason during the installation, you find that the neutral wire has voltage, you may take a few steps to reduce the voltage. As it can hinder the installation process.
Troubleshooting
It is a critical step to troubleshoot all electrical components, even a 4-way switch, once it’s been installed to ensure it is operating properly. The steps to troubleshooting a 4-way switch are written below.
Troubleshooting the 4-Way Switch
- Turn on the power at the main panel breaker that you shut off when you started the installation.
- Check if all of the 4 switches are working properly or not. They should all be able to individually turn the switch on and off.
- Flip each switch to try to turn the light or device on.
- Flip each of them again to try to turn the device off.
- If all 4 switches work as intended, the installation has been done properly.
- If not, you may have to recheck the wiring again. And rewire is needed.
These are the steps you need to follow to troubleshoot your 4-way switch installation.
Summary
Throughout this article, I have discussed all of the steps necessary to know how to wire a 4 way switch. The steps have been discussed in detail so that you find it easy and simple to do this task yourself.
However, like with any electrical job, you should proceed with utmost caution and take all appropriate safety precautions before beginning. To make the installation procedure easier and more precise, use suitable rubber gloves and boots, as well as the essential equipment.

![How Many Ways Can You Wire a 3-Way Switch? [Diagram & Details]](https://wiringsolver.com/wp-content/uploads/2021/10/How-Many-Ways-Can-You-Wire-a-3-Way-Switch.webp)