Maybe you have run out of room for a new breaker. Or maybe you need more circuits. So what can you do? A subpanel is just the solution that you need. But where does a subpanel get its power from? It is usually always fed from the main panel.
But, how to feed a subpanel from a main panel?
There are a couple of steps for the procedure. First, you have to acquire a subpanel and choose an appropriate location for it. Mounting the subpanel comes next. Then we can move on to the actual wiring procedure.
This article will provide you with a detailed guide on how you can install a subpanel and feed it from your main panel.
Feeding a Subpanel from the Main Panel:
Before you can start the actual wiring procedure, you’ll need to go through several steps. Such as choosing an appropriate subpanel and mounting it. I will go through all of these steps, including the wiring procedure below.
Step 1: Choosing an Appropriate Subpanel
This is one of the crucial steps for installing a subpanel. Because it is necessary to check whether the subpanel would put a huge load on your system or not. Or whether your system can handle it or not. Here are a few key considerations for choosing an appropriate subpanel.
- Choose a subpanel, that is rated for an amperage rating less than or equal to your main panel. For example, can a 100 amp main panel feed a 100 amp sub panel? Yes, it can. But you have to keep the wire size in check.
- The next thing to consider is, how many circuits you want to run off this subpanel. You should get a subpanel that can accommodate as many circuits as you plan to run on it.
- Consult with a professional to get detailed instruction and advice on what should be your appropriate method of operation.
Step 2: Choosing a Proper Location for the Subpanel
A subpanel needs as much attention as your main panel. You cannot just install it anywhere. There are a few guidelines that you must follow before deciding on a place to install your subpanel.
- Make sure to never install a subpanel in a kitchen or a bathroom. A subpanel has to deal with a lot of power flowing through it. Hence, you have to make sure it does not come into contact with any sort of water or vapor. As it can cause a serious accident.
- You may choose to install your subpanel right beside your main panel. This will allow you to extend the number of circuits while allowing you to power off the subpanel if ever need be while also reducing the cable length.
- You should not install a subpanel in a congested place either. Where it has the opportunity to overheat. As it could lead to fires or accidents.
Once you have chosen a definite location, you can move on to mounting the subpanel.
Step 3: Mounting the Subpanel on the Wall
Mounting the subpanel can be a hard task, as they can be quite heavy. But, if you follow a few simple steps, it shouldn’t be a bother.
- Mark out the outline of the subpanel box and keep track of where the studs are.
- Use a marker to put marks on your wall for the holes.
- Drill mounting screws on your wall and make sure they are secured properly.
- Hold the subpanel up, and place it onto the top of the mounting screws.
- Screw the subpanel box firmly into place.
Step 4: Feeding the Subpanel from the Main Panel
If you were wondering how to wire a 100 amp sub panel from a 200 amp main panel, this is the step for you. Can you feed a subpanel through a breaker? Yes, you can. Check out the steps below to learn how to feed a subpanel from a main panel.
- Make sure the power is turned off from your main panel before proceeding with any sort of wiring.
- Your subpanel will have holes on the side for cables. They might be blocked with plugs. Use a hammer to push them out and free the holes.
- The feeder cable from your main panel will have 4 wires. The power will be fed to the subpanel from these cables. Push it through the hole that you made.
- The four wires will be black, red, white neutral, and a bare metal wire.
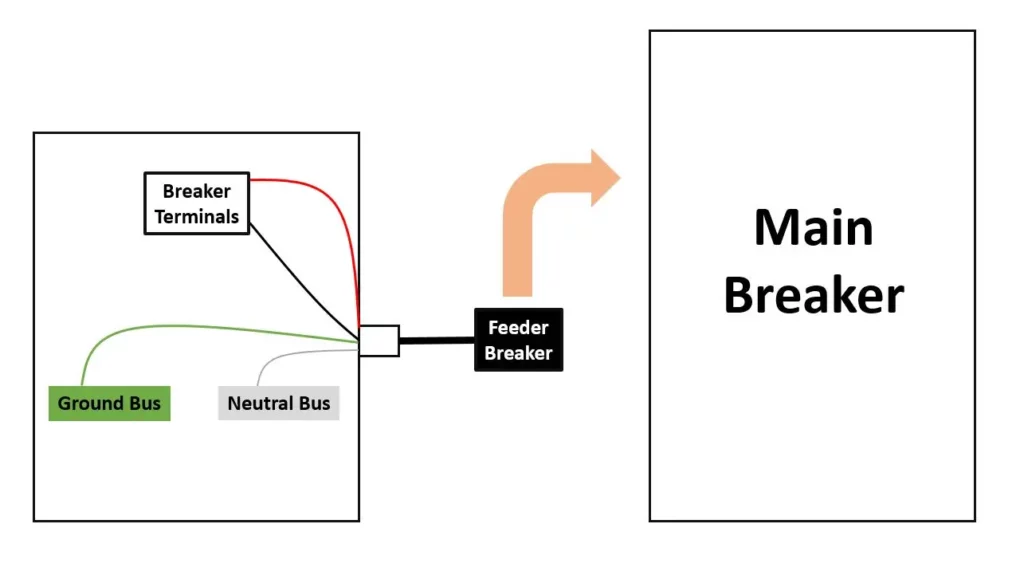
- The first step should be to connect the white neutral to the neutral bus bar. Secure it tightly in place with a screw.
- Similarly, connect the ground wire to the ground bar and secure it properly.
- The red and black wires later have to be inserted into the feeder breaker. A feeder breaker is the one through which power is fed to the subpanel. It will most likely be a big black cube.
- Snap the feeder breaker into the main panel. This is where power will be supplied from to the subpanel.
- Connect the red and black wires to the subpanel terminals.
- Your installation is now complete. Simply turn the breaker on and you should have power supplying through the subpanel now.
These are the steps through which you can feed your subpanel from the main panel. However, if you wish to install an automatic transfer switch in your subpanel. You might need to go through additional steps.
Summary
I have provided an in-depth guide to the entire procedure of feeding a subpanel from the main panel. I have also discussed important factors such as the location and requirements of the subpanel.
I hope you have gotten a clear understanding of how to feed a subpanel from a main panel. However, if any confusion arises, do not hesitate to contact a professional.
![How to Test A 3-Way Switch? [Complete Guide]](https://wiringsolver.com/wp-content/uploads/2022/08/How-to-Test-A-3-Way-Switch.jpeg)

![Can You Plug A Fridge Into A GFCI Outlet? [Answered]](https://wiringsolver.com/wp-content/uploads/2022/05/Can-You-Plug-A-Fridge-Into-A-GFCI-Outlet.jpeg)